You are using an out of date browser. It may not display this or other websites correctly.
You should upgrade or use an alternative browser.
You should upgrade or use an alternative browser.
Getting tubes in the hearing aids
- Thread starter Zeeza
- Start date
Thank you!I have heard that you can heat the tube with a hair dryer to soften the tube and make it more flexible.
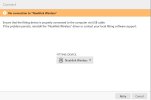
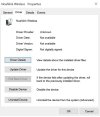
Now, I have trouble connecting Noah. It gives out a green light when I insert the cable into my laptop but I get this message.
What could the problem be?
P.S. The cable is connected well.
pvc
Well-Known Member
- Joined
- Apr 12, 2023
- Messages
- 2,191
- Reaction score
- 629
Noah? Don't use Noah (currently Noah 4 or Noah-ES). You probably meant Noahlink Wireless (hearing aid programming device).
Here's a clip from a DIY School Hearing Aids (v2.2) PDF file named (Noahlink Wireless - DIY User Guide);
Note of caution: There is still no Apple ARM driver available for Noahlink Wireless (and also for Noahlink Wireless 2) so this still cannot be used for newer ARM technology (Apple silicon) based computers (even under emulation).
Noahlink Wireless is a USB plug-and-play programming interface so it’s pretty simple. First, install your modern (not legacy) fitting software. This should setup a Noahlink Wireless driver as per the HIMSA downloads webpage. But in the past it didn’t always produce happy results. So if you encounter Noahlink Wireless driver problems then read the trouble shooting steps in the Appendix of this document.
Connect Noahlink Wireless to any USB2 or USB3 port on your computer, or connect Noahlink Wireless 2 to a USB-C port. A solid green light for (2-3 seconds) on Noahlink Wireless without any errors indicates that Noahlink Wireless is powered on and ready to use. Easy Peasy, right?
How to connect the Fitting Software to your Hearing Aids?
Again; this is Bluetooth Low Energy/BLE, which is not the same as BlueTooth used in cellphones and such. So forget about typical pairing. There is no pairing involved. Instead you need to Connect. But first choose a device location with a clear line-of-sight to the hearing instruments and away from interfering wireless sources (WLAN, streamers).- In your fitting software you will need to Select or Specify that Noahlink Wireless is to be used as your programming device. Your fitting software may be defaulting to a different programming device. So check this first.
- Prepare the hearing aids to enter fitting mode. This is accomplished with an off-on cycle of the hearing aids. For disposable battery models open and close the hearing aid battery doors. For rechargables apply a very long button press for off and repeat for on. Or, place them in your charger and then remove them in order to turn the hearing aids off and on.
- Tip: Don’t walk away from your computer/Noahlink Wireless with connected hearing aids in your ears! This is especially important during lengthly hearing aid firmware updates and could result in bricking some hearing aid models.
- Your fitting software may require that you Click an option to Connect to your hearing aids. But there could also be prerequisites such as (selecting a client). Optionally, your fitting software may automatically connect after you have selected a client and proceed into the fitting session.
- Your hearing aids may need to have Bluetooth turned off for a connected cellphone before trying to connect Noahlink Wireless to your hearing aids.
- Installed the fitting software first (before plugging-in Noahlink Wireless) to provide a driver.
- Connected your Noahlink Wireless device via a USB port/non-USB hub.
- Verified that your hearing aids do indeed support the Noahlink Wireless BLE protocol.
- Prepped your hearing aids to enter fitting mode/off-on cycle.
- Selected Noahlink Wireless as your programming device in the fitting software.
- Turn Bluetooth off for any other connected-to-HA devices.
- Taken the proper fitting software action (perhaps clicking a Connect option) to Connect the fitting software to your hearing aids.
Last edited:
Yes
Yes, it's Noah wireless. I followed the steps but still not connected.Noah? Don't use Noah (currently Noah 4 or Noah-ES). You probably meant Noahlink Wireless (hearing aid programming device).
Here's a clip from a DIY School Hearing Aids (v2.2) PDF file named (Noahlink Wireless - DIY User Guide);
Note of caution: There is still no Apple ARM driver available for Noahlink Wireless (and also for Noahlink Wireless 2) so this still cannot be used for newer ARM technology (Apple silicon) based computers (even under emulation).
Noahlink Wireless is a USB plug-and-play programming interface so it’s pretty simple. First, install your modern (not legacy) fitting software. This should setup a Noahlink Wireless driver as per the HIMSA downloads webpage. But in the past it didn’t always produce happy results. So if you encounter Noahlink Wireless driver problems then read the trouble shooting steps in the Appendix of this document.
Connect Noahlink Wireless to any USB2 or USB3 port on your computer, or connect Noahlink Wireless 2 to a USB-C port. A solid green light for (2-3 seconds) on Noahlink Wireless without any errors indicates that Noahlink Wireless is powered on and ready to use. Easy Peasy, right?
How to connect the Fitting Software to your Hearing Aids?
Again; this is Bluetooth Low Energy/BLE, which is not the same as BlueTooth used in cellphones and such. So forget about typical pairing. There is no pairing involved. Instead you need to Connect. But first choose a device location with a clear line-of-sight to the hearing instruments and away from interfering wireless sources (WLAN, streamers).
You should be able to connect easily after you have;
- In your fitting software you will need to Select or Specify that Noahlink Wireless is to be used as your programming device. Your fitting software may be defaulting to a different programming device. So check this first.
- Prepare the hearing aids to enter fitting mode. This is accomplished with an off-on cycle of the hearing aids. For disposable battery models open and close the hearing aid battery doors. For rechargables apply a very long button press for off and repeat for on. Or, place them in your charger and then remove them in order to turn the hearing aids off and on.
- Tip: Don’t walk away from your computer/Noahlink Wireless with connected hearing aids in your ears! This is especially important during lengthly hearing aid firmware updates and could result in bricking some hearing aid models.
- Your fitting software may require that you Click an option to Connect to your hearing aids. But there could also be prerequisites such as (selecting a client). Optionally, your fitting software may automatically connect after you have selected a client and proceed into the fitting session.
- Your hearing aids may need to have Bluetooth turned off for a connected cellphone before trying to connect Noahlink Wireless to your hearing aids.
- Installed the fitting software first (before plugging-in Noahlink Wireless) to provide a driver.
- Connected your Noahlink Wireless device via a USB port/non-USB hub.
- Verified that your hearing aids do indeed support the Noahlink Wireless BLE protocol.
- Prepped your hearing aids to enter fitting mode/off-on cycle.
- Selected Noahlink Wireless as your programming device in the fitting software.
- Turn Bluetooth off for any other connected-to-HA devices.
- Taken the proper fitting software action (perhaps clicking a Connect option) to Connect the fitting software to your hearing aids.
pvc
Well-Known Member
- Joined
- Apr 12, 2023
- Messages
- 2,191
- Reaction score
- 629
Tell us about your laptop.Note of caution: There is still no Apple ARM driver available for Noahlink Wireless (and also for Noahlink Wireless 2) so this still cannot be used for newer ARM technology (Apple silicon) based computers (even under emulation).
pvc
Well-Known Member
- Joined
- Apr 12, 2023
- Messages
- 2,191
- Reaction score
- 629
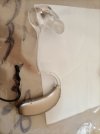
Oh, is it the Nadia BTEs shown in the picture of your tubes? Not all hearing aid models can use Noahlink Wireless. Here's a clip from a (DIY School Legacy Hearing Aids (v2.2) PDF file named (Choose Hardware-Programming Device for Phonak);
- Legend: NW = Noahlink Wireless/Caution: Noah, NOAHlink & Noahlink Wireless are 3 different things
- Legend: HP = (Hi Pro or mini Pro) with Phonak/Unitron cs44-a cables and also maybe flexstrips or adapters
- 2021-Q1 Naída P-PR BTE = NW
- 2020-Q1 Naída M-SP BTE = NW, HP
- 2017-3Q Naída B-UP BTE = iCube II, or HP
- 2014-Q4 Naída V-RIC = iCube II, or HP
- 2014-Q4 Naída V-SP BTE = iCube II, or HP
- 2014-Q4 Naída V-UP BTE = iCube II, or HP
- 2012-Q3 Naída Q-SP BTE = iCube II, or HP
- 2012-Q3 Naída Q-UP BTE = iCube II, or HP
- 2008 Naída S CRT-IX RIC = iCube II, or HP
- 2008 Naída S CRT-V RIC = iCube II, or HP
- 2008 Naída S CRT-III RIC = iCube II, or HP
- 2008 Naída S IX-SP BTE = iCube II, or HP
- 2008 Naída S IX-UP BTE = iCube II, or HP
- 2008 Naída S V-SP BTE = iCube II, or HP
- 2008 Naída S V-UP BTE = iCube II, or HP
- 2008 Naída S III-SP BTE = iCube II, or HP
- 2008 Naída S III-UP BTE = iCube II, or HP
- 2008 Naída S I-SP BTE = iCube II, or HP
- Naída S I-UP BTE = iCube II, or HP
Naída M70. So how am I supposed to program them now!?Not all hearing aid models can use Noahlink Wireless.
My laptop is HP AMD PRO A10-8700B R6
pvc
Well-Known Member
- Joined
- Apr 12, 2023
- Messages
- 2,191
- Reaction score
- 629
Okay, which version of MS Windows?
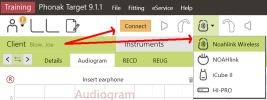
Now, what happens with your Noahlink Wireless lights when you click the Connect button (see image above)?
- Assuming the hearing aids have been prepped to enter fitting mode/off-on cycled.
- In Phonak Target 9.1.1 is Noahlink Wireless selected as the hearing aid programming device?
- Also, Bluetooth is off for any other connected-to-HA devices such as your cellphone.

Now, what happens with your Noahlink Wireless lights when you click the Connect button (see image above)?
What does that mean?
P.S. I downloaded the driver from this link
 www.himsa.com
P.S. I downloaded the driver from this link
Noahlink Wireless Downloads – HIMSA

Last edited:
pvc
Well-Known Member
- Joined
- Apr 12, 2023
- Messages
- 2,191
- Reaction score
- 629
You don't need to download a driver from HIMSA.You should be able to connect easily after you have;
- Installed the fitting software first (before plugging-in Noahlink Wireless) to provide a driver.
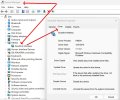
Maybe use Device Manager to uninstall the Device and then Unplug Noahlink Wireless and plug it in again to see if it picks up the correct driver.
I missed this reply. I downloaded the drivers and it got connected
In Global and Fine tuning, what am I supposed to do? I can't find much details regarding them.
In Global and Fine tuning, what am I supposed to do? I can't find much details regarding them.
You don't need to download a driver from HIMSA.
Maybe use Device Manager to uninstall the Device and then Unplug Noahlink Wireless and plug it in again to see if it picks up the correct driver.
Last edited:
pvc
Well-Known Member
- Joined
- Apr 12, 2023
- Messages
- 2,191
- Reaction score
- 629
Don't confuse in-Situ measurements with REM. Some professional audiologists also use an additional measuring system to achieve→ REM/Real Ear Measurement and that may change your gain settings to more closely match the Rx/prescription for your hearing loss. I don't think you did REM? It requires additional ear probes inserted right next to your eardrums plus expensive REM Equipment.Did REM
What you did;
- You can enter your audiogram and then Rx/Prescribe your gain settings from the audiogram.
- Or, you can perform in-Situ listening for beeps in your hearing aids.
- If you do both, then the in-Situ measurements will be used to override the Audiogram frequency measurements
- Try the (My Audiogram client) by entering your Audiogram only.
- Try the (in-Situ client) using in Situ.


